This guide will walk you through the steps of adding product data to the Shopify CSV using the most common settings that we see for an average product. To follow this guide, you must have some basic product information such as weights and images AND you must have a G Suite account. Note that your product images must be stored online with a publicly accessible URL.
Audience
This guide is intended for intermediate Shopify Merchants.
On the Google Sheets page, click Blank in the Start a new spreadsheet section
From the Untitled Spreadsheet page, go to File > Import...
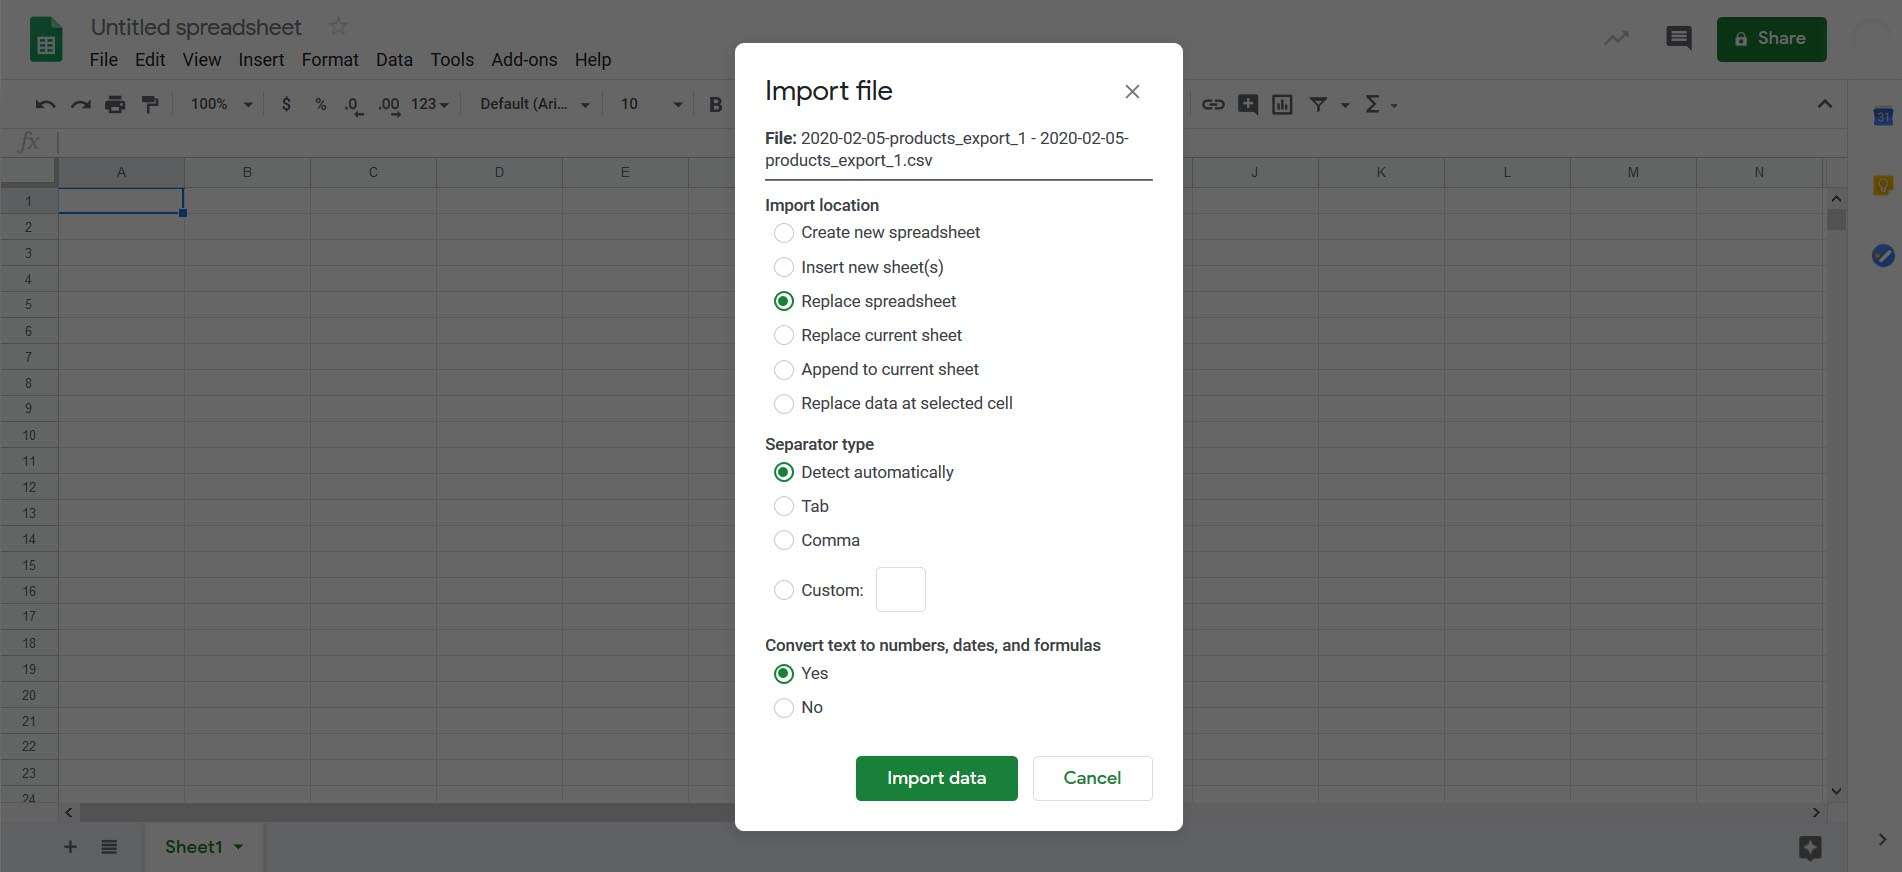
Under Import File, select Upload
Navigate to the folder where you downloaded the CSV, and select the CSV
In the Import file dialogue, select Import action> Replace spreadsheet, Separator character > Detect automatically, and Convert text to numbers and dates > Yes
Click Import
Step 2
Enter all required data for a single product
Start with an easy product, one with no variants (no options for the end-user to select such as size, colour, etc.).
First, add the Title. The title is the name of your product, keep it simple. Avoid cluttering the title with additional information such as colour/size or product numbers.
Then, add the Handle. This can be the same as the title but should be all lower-case with dashes "-" instead of spaces.
For the Body (HTML), enter a more in-depth description of the product (4-6 sentences). For now, this can be entered as plain-text. If you are an advanced user, you can also add html to this section to add markup for improved information hierarchy.
Under Vendor, enter the name of the company that supplies or manufactures the product. This is especially important if you are selling merchandise from a recognizable brand.
For Type, declare what the product is in the simplest terms possible. A "43 inch LCD TV with 5D display" would just be a TV, or Television.
Under Tags, enter a list of lower case words separated by commas that describe the product. Note that tags in this context have no impact on SEO. Tags are used to filter your products within your Shopify theme.
Under Published, enter "TRUE"
Under Option 1 Name, enter "Title".
Under Option 1 Value, enter "Default Title".
For the Variant SKU, enter your internal stock keeping unit (SKU) for the product. If you do not have internal SKUs, this is a good place to start creating them.
Under Variant Grams, enter the boxed weight of the product in grams.
Under Variant Inventory Tracker, enter "shopify" if you intend to use your website to track inventory. Otherwise, leave this column blank.
For Variant Inventory Qty, enter the current stock level as a numerical value if you intend to use your website to track inventory. Otherwise, leave this column blank.
Set Variant Inventory Policy to "continue".
Under Variant Fulfillment Service, enter "manual".
For Variant Price enter the pre-tax price at which you intend to sell the product.
Leave Variant Compare at Price blank for now.
Under Variant Requires Shipping, enter "TRUE".
Under Variant Taxable, enter "TRUE".
Under Variant Barcode, enter the bar code for the product, if possible. If you do not have bar codes, then leave this cell blank.
To add images to your product listing, you must first upload your product images to a website. This can be done through your Shopify dashboard or a free image hosting service such as Imgur. Once your images are hosted online, enter the URL for each image under Image Src (1 per row). If you have multiple images for your product, that's great. Just go down a row for each image URL.
Once all image URLs for your product have been entered, number them 1,2,3, etc. top to bottom under Image Position.
Under Image Alt Text, describe each image as thoroughly as possible in up to 16 words. For more information on adding alt tags, see our guide, How An Agency Adds Alt Tags To Products In Bulk.
Under Gift Card, enter "FALSE".
Leave Variant Image blank for now.
For Variant Weight Unit, enter "g".
Leave Variant Tax Code blank for now.
Under Cost per item enter the price you pay for your product, or the cost of producing your product yourself. This will enable useful analytics data once you start selling.
Finally, revisit the Handle column. Each additional image row that you added needs to be associated with your product. To tell Shopify that the additional row(s) still refer to the same product, repeat the same handle that you entered earlier on each row that contains a product image.
Step 3
Enter additional required data for a product with variants
Product variants are options that a customer can select before adding your product to their cart. They could be different sizes, colours, materials, etc. Adding a product with variants is almost the same process as adding an individual product. This section focuses on additional information that must be added rather than repeating the steps that you went through above.
This time, instead of entering "Title" under Option 1 Name, enter a label for the variant type (ie. Material, Colour, Size).
Then, under Option 1 Value, enter all possible variants for the chosen Title (1 per row).
Up to 2 additional variant types can be added by filling out Option 2 Name + Value, and Option 3 Name + Value, if desired.
Each column with Variant in the title must be filled out for each variant.
For columns such as Variant SKU and Variant Grams, enter unique data specific to each variant.
For columns such as Variant Inventory Policy, in which you entered a fixed value above, enter the same values as above.
Variant Compare at Price, Variant Inventory Tracker, and Variant Tax Code can remain blank.
The process for adding images to a variant is identical to adding images to a single product.
The row in which an image is added has no correlation to which variant it is associated with.
To associate a specific image with a variant, you must fill out the Variant Image column.
Under Variant Image, enter the URL for the image that best represents each variant. Note that the URLs entered in this column must also be included as images under the Image Src column.
Filling in the correct number of Handle cells for variants is sometimes confusing to new users.
If your product has more images than variants, repeat the handle for each image row. For example, a product with 3 variants and 5 images would require the handle to be entered 5 times.
If your product has more variants than images, repeat the handle for each variant row. For example, a product with 3 variants and 1 image would require the handle to be entered 3 times.
Step 4
Save your CSV file to your computer
If you used Google Sheets to edit your CSV, you need to download the CSV file to your computer before you can upload it to Shopify.
At the top of the page, select File > Download > Comma-separated values (.csv, current sheet)
Save the file to your computer and note the location of the file
Step 5
Import your CSV file to Shopify
The final step is to import your csv file into Shopify. This will automatically create all of your new products, and add your images to the file library in Shopify.
From your Shopify admin, go to Products > All products
Click Import
From the dialogue, choose Browse...
Navigate to your CSV file, and select Open
From the dialogue, click the Replace any current products that have the same handle. Existing values will be used for any missing columns. check box
Click Upload file
Feel free to close the window. When your CSV file is successfully uploaded, your store owner will receive a confirmation email
This guide was written for 2H Media by Aron Murch with contributions by Matthew Herchel.
Based on official Shopify Resources. This guide is maintained by 2H Media.